 Save to Pinterest
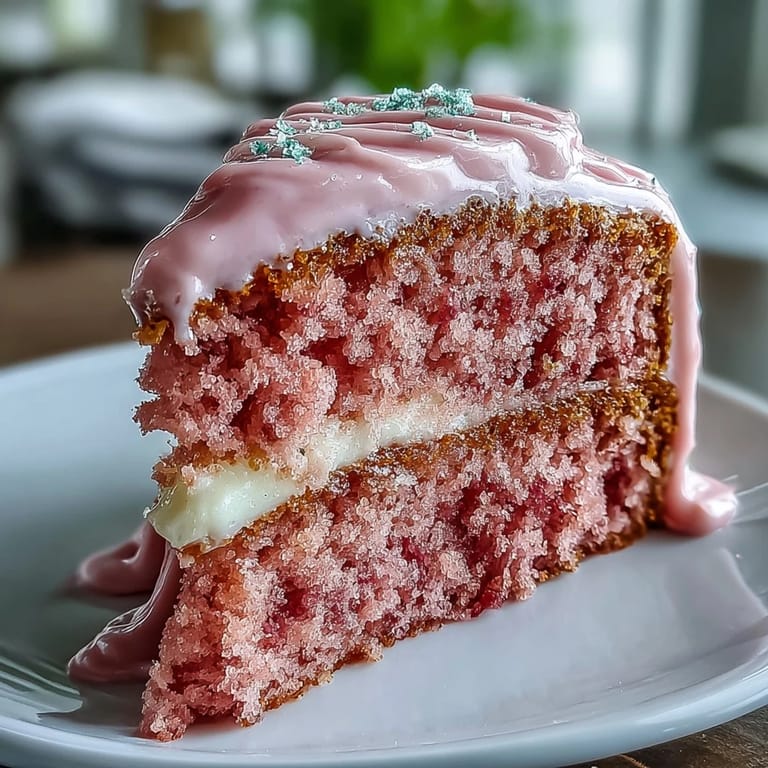
 When my kitchen was overtaken by the soft clinking of stemware and the scent of sweet pink batter, I knew this Rosé Velvet Cake would become my showstopper for special occasions. Mixing rosé into cake batter seemed bold at first, but the tender crumb and delicate flavor quickly won me over. On more than one occasion, a little frosting ended up on my nose from absent-mindedly licking the spatula mid-assembly. And while the gold drip can get a bit messy, each glimmer made the effort memorably worthwhile. The pink-tinged layers always spark conversation—it feels like sharing a small piece of celebration with every slice.
The last bridal shower I baked this for was buzzing with laughter, and the first cut through those ombré layers paused every conversation in the room. Watching the bride's expression light up when she tasted the gold-tipped slice is still one of my favorite kitchen successes.
Ingredients
- Cake flour: Makes the cake light and fluffy; sift for the softest crumb.
- Granulated sugar: Creaming it thoroughly with butter and oil yields an airy texture and gentle sweetness.
- Baking powder and baking soda: Give the cake lift—always check the expiry date for the best rise.
- Salt: Just a pinch wakes up all the other flavors.
- Unsalted butter: Needs to be perfectly softened so it creams into the batter smoothly.
- Vegetable oil: Adds moistness and keeps the layers supple even after refrigeration.
- Large eggs: Room temperature eggs blend more easily into the batter and ensure an even rise.
- Rosé wine (not sparkling): Pick one you'd happily sip—its floral notes make the cake unique.
- Vanilla extract: Brings warmth and depth to each bite.
- White vinegar: Keeps the crumb tender and enhances the pink hue.
- Pink gel food coloring (optional): For a truly vibrant, photo-worthy color.
- Cream cheese: Be sure it's not too cold or your frosting will be lumpy.
- Powdered sugar: Sift well to avoid any pesky clumps in the frosting.
- Heavy cream: Essential for a glossy, pourable drip.
- White chocolate: Choose a high quality bar for the smoothest melt and best backdrop to the gold.
- Edible gold luster dust: Confirm it's food-safe before using—it's what gives your cake its wow factor.
- Vodka or lemon extract: Use just enough for painting the gold; alcohol evaporates, leaving just shine.
Tired of Takeout? 🥡
Get 10 meals you can make faster than delivery arrives. Seriously.
One email. No spam. Unsubscribe anytime.
Instructions
- Prepare Your Pans:
- Line each of your three cake pans with parchment and a swipe of butter; it prevents sticking and makes for an easy unmold later on.
- Mix Dry Ingredients:
- Whisk together flour, baking powder, soda, and salt until just blended and the kitchen smells subtly toasty.
- Cream Butter, Oil & Sugar:
- Beat until pale and fluffy, scraping down the sides; it should look airy and almost mousse-like.
- Add Eggs & Flavorings:
- Drop in eggs one by one, letting each fully mix in, then follow with vanilla and vinegar for brightness.
- Alternate Flour & Rosé:
- Add flour and rosé in turns, gently folding until the last streak of batter vanishes; stir in pink coloring if using.
- Bake the Cakes:
- Divide the blush batter evenly and bake until domed and a skewer comes out clean, around 30–35 minutes.
- Cool & Unmold:
- Let cakes rest in the pans briefly before flipping onto wire racks to release trapped steam.
- Make Cream Cheese Frosting:
- Cream together butter and cream cheese, sift in sugar in batches, then vanilla and salt—it should hold soft peaks.
- Assemble and Frost:
- Level your cakes if needed, then stack with generous frosting layers; take your time smoothing the sides.
- Make Gold Drip:
- Warm cream and pour it on chopped white chocolate; let it rest, then whisk to glossy perfection before spooning along cake edges.
- Paint the Drip Gold:
- Mix luster dust with vodka until liquid-gold forms; using a tiny food-safe brush, paint each drip until it gleams.
 Save to Pinterest
 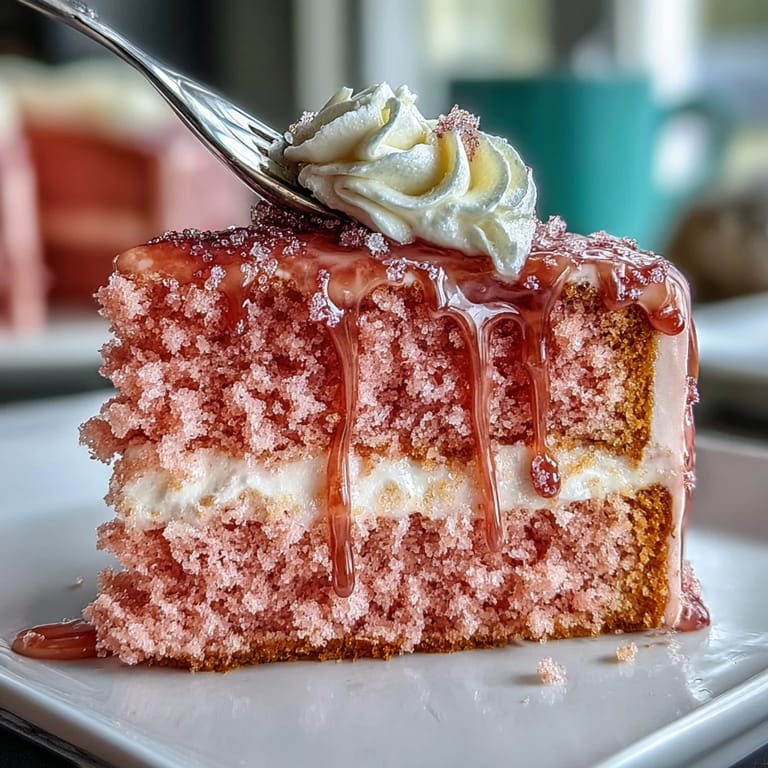 Save to Pinterest
 At my sister’s engagement party, the cake stood at the center of the dessert table, and guests kept sneaking back for second slivers. In the glow of the late afternoon sun, the gold shimmer caught everyone’s eye and the last slice disappeared before I could sneak it home.
Decorating Details That Make a Difference
The first time I painted on the gold, I used too much liquid and ended up with streaks running down the sides. Less is more; using almost dry strokes gets that high-shine effect without streaking or pooling at the edges. Chilling the cake just before painting turns the gold almost mirror-like and sets the color fast.
How to Store and Serve for Maximum Wow
This cake keeps best refrigerated, but taking it out 45 minutes before serving brings the flavors and delicate crumb back to life. If you’re serving at a party, use a smooth, warm knife for cleaner slices and more dramatic layers. For extra flair, pair with a cold glass of rosé or set edible flowers along the edges just before presenting.
Troubleshooting and Last-Minute Rescue Tricks
If you overbake the cake, a generous sweep of syrup between layers revives any dryness in an instant. Accidentally cracked a layer? Hide the patch with a thick swirl of cream cheese and an extra gold detail. No cake is ever wasted—I’ve even used less-than-perfect scraps for midnight trifle.
- If the drip sets too quickly, gently warm it again for a smoother pour.
- Keep extra frosting on hand to fix unexpected gaps.
- Always use clean tools when applying gold, so the finish stays bright.
 Save to Pinterest
 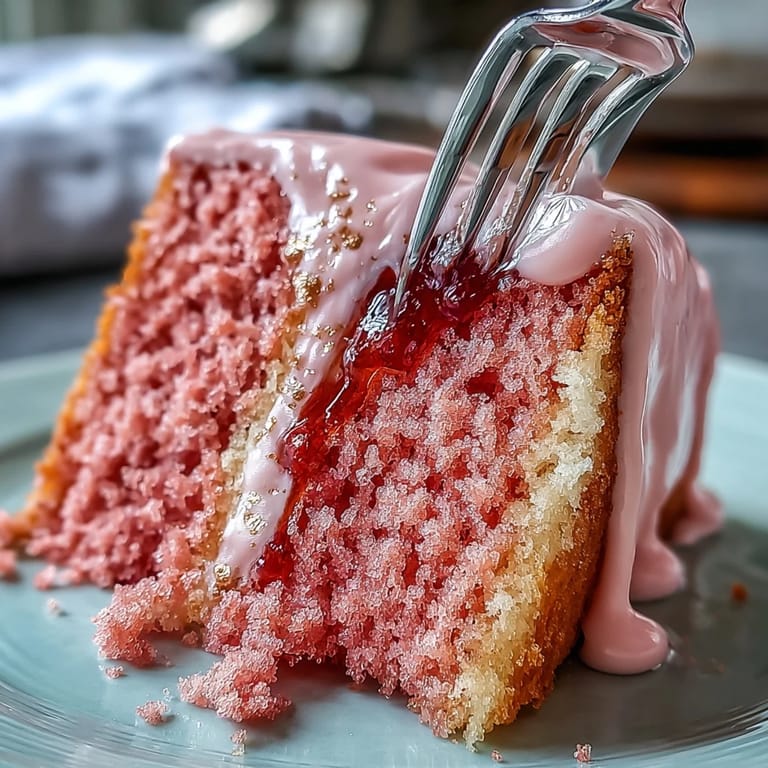 Save to Pinterest
 Baking this cake always turns an ordinary afternoon into something sparkling—whether for a party or just because. I hope you enjoy making and sharing each golden slice as much as I have.
Recipe FAQs
- → Can I make this without alcohol?
Yes. Substitute equal parts pink grape juice plus a splash of lemon juice to mimic rosé acidity and color. Adjust sweetness if the juice is sweeter than the wine you would have used.
- → How do I deepen the pink hue naturally?
Use a small amount of concentrated pink gel food coloring or a pinch of beet powder for a deeper tone. Add color sparingly to avoid altering batter consistency.
- → What keeps the cake layers from sinking?
Avoid overmixing once the flour is added, measure leavening accurately, and ensure the oven temperature is steady. Bake until a toothpick comes out with a few moist crumbs; cooling in the pans briefly helps set the structure.
- → How can I get a smooth, stable cream cheese frosting?
Beat softened cream cheese and butter until completely smooth before adding sifted powdered sugar in batches. Chill the frosting briefly if it feels too soft for spreading to achieve clean edges between layers.
- → Tips for a neat gold drip finish?
Make a white-chocolate ganache with warm cream and chocolate, cool slightly so it’s still pourable but not hot, then drip over a chilled cake. Mix edible luster dust with vodka or lemon extract to paint the drips once set.
- → How should I store and serve the cake?
Refrigerate the assembled cake; remove it from the fridge 30–60 minutes before serving so the flavors and texture reach room temperature. Keep covered to prevent drying.