 Save to Pinterest
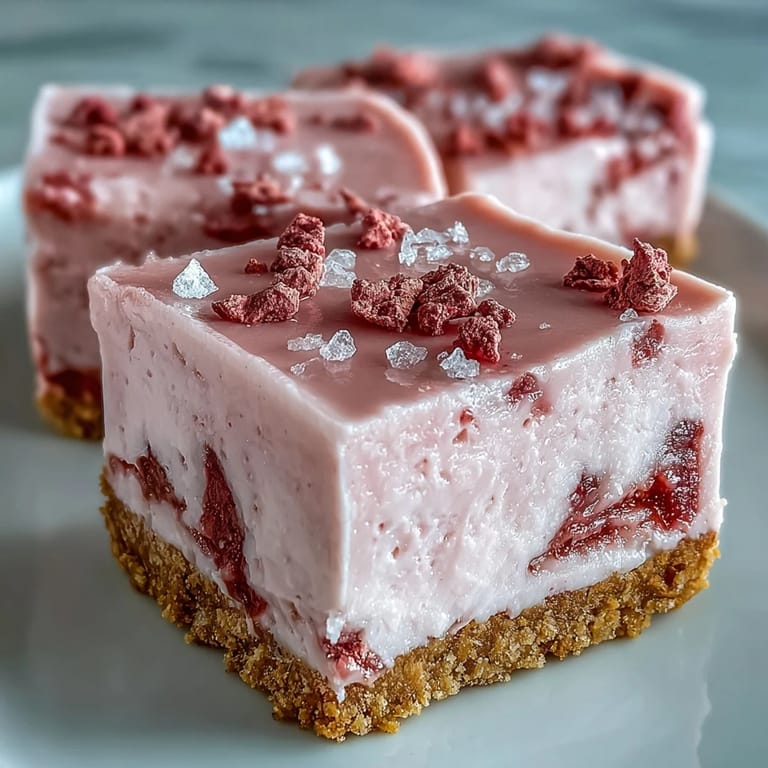
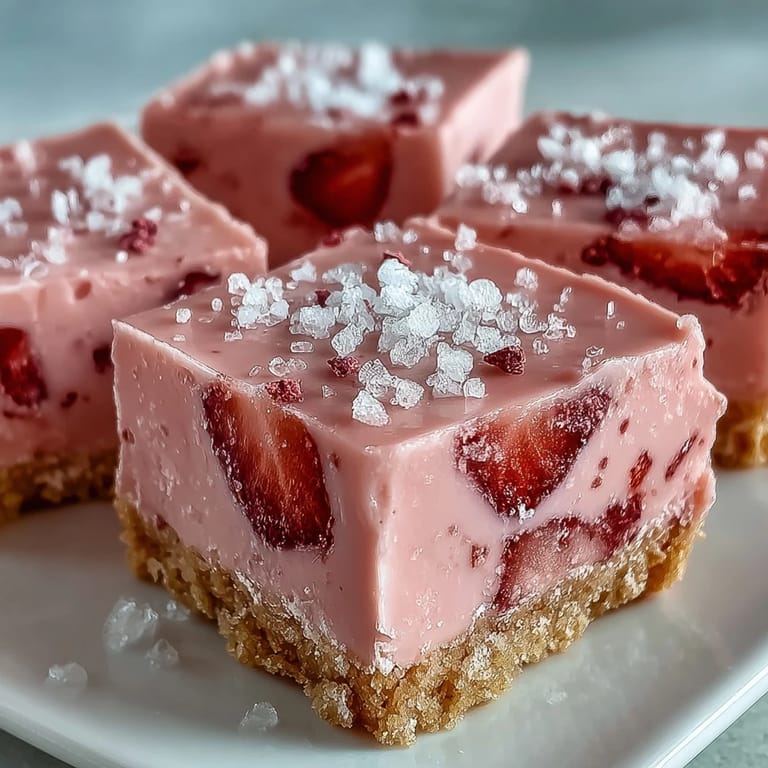
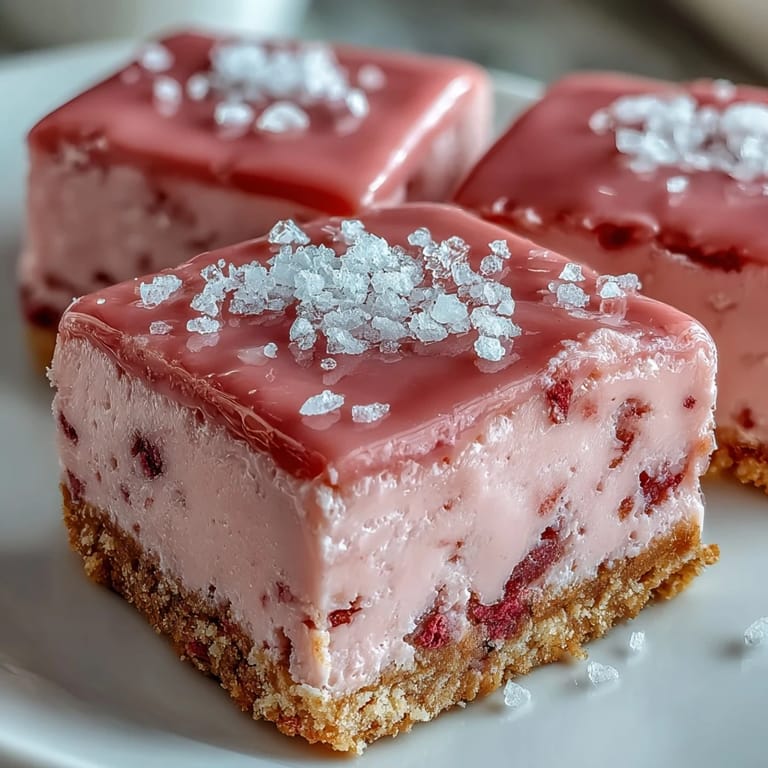
 Last spring, I opened a bag of freeze-dried strawberries and the scent hit me like summer itself had been sealed inside. I'd been meaning to try something new with white chocolate, and the idea of turning those crisp, concentrated berries into a creamy fudge layer felt almost too easy to work. Twenty minutes later, I had a pan chilling in the fridge and spent the next three hours peeking in like a kid waiting for snow to stick. When I finally sliced into those bright pink squares, the contrast between the buttery crust and the silky fudge made me wonder why I'd never thought of this before.
I brought these to a friend's backyard dinner, and halfway through the meal someone asked if I'd ordered them from a fancy bakery. The compliment felt almost guilty, given how little effort they actually took. By the time I admitted they were no-bake, three people had already asked for the recipe, and I watched them disappear faster than anything else on the table.
Ingredients
- Digestive biscuits or graham crackers: These form a sturdy, slightly sweet base that won't crumble when you slice, and crushing them fine ensures the crust packs down tight.
- Unsalted butter: Melted butter binds the crumbs together and adds richness without overwhelming the strawberry layer above.
- White chocolate chips: They melt smooth and creamy, giving the fudge its luscious texture and mild sweetness that lets the strawberry shine.
- Sweetened condensed milk: This is the magic that sets the fudge without any candy thermometer, turning simple ingredients into something velvety and firm.
- Freeze-dried strawberries: Ground to powder, they deliver concentrated flavor and natural color without adding liquid that would soften the fudge.
- Pure vanilla extract: A teaspoon rounds out the sweetness and deepens the strawberry note, making the whole thing taste more complete.
- Pinch of salt: It balances the sugar and brings out the berry flavor, a tiny addition that makes a noticeable difference.
- Pink or red gel food coloring: Optional, but a drop or two intensifies the color if you want that vibrant pink pop.
Tired of Takeout? 🥡
Get 10 meals you can make faster than delivery arrives. Seriously.
One email. No spam. Unsubscribe anytime.
Instructions
- Prepare the pan:
- Line your square pan with parchment, leaving enough overhang to lift the fudge out later. This simple step saves you from wrestling with a spatula when it's time to slice.
- Make the crust:
- Stir crushed biscuits and melted butter until every crumb is coated and the mixture clumps when you squeeze it. Press it firmly into the pan so it holds together under the weight of the fudge.
- Chill the base:
- Pop the crust in the fridge for ten minutes to firm up. This quick rest keeps it from mixing into the fudge layer when you pour.
- Melt the chocolate:
- Set a heatproof bowl over simmering water and stir white chocolate and condensed milk gently until smooth. Low, steady heat prevents seizing and keeps the mixture silky.
- Add strawberry and flavorings:
- Remove from heat and stir in strawberry powder, vanilla, salt, and coloring if using. Mix until the color is even and the powder has dissolved completely.
- Pour and spread:
- Pour the fudge over the chilled crust and use a spatula to spread it into every corner. A smooth, level top makes slicing easier later.
- Chill until firm:
- Cover loosely and refrigerate for at least two to three hours. The fudge should feel firm to the touch, not sticky or soft.
- Slice and serve:
- Lift the whole block out using the parchment, then cut into sixteen squares with a sharp knife. Wipe the blade between cuts for clean edges and neat presentation.
 Save to Pinterest
 The first time I served these, my neighbor took one bite and closed her eyes for a second, then said it tasted like strawberry ice cream in solid form. That comparison stuck with me, because it's exactly that kind of smooth, melt-on-your-tongue sweetness, only you don't need a freezer or a machine. It became my go-to whenever I wanted something impressive without turning on the oven.
Choosing Your Strawberries
Freeze-dried strawberries are worth hunting down because they grind into a fine, intensely flavored powder that dissolves right into the fudge without adding moisture. Fresh puree works in a pinch, but you'll need to strain it well and use a little less, or the texture won't set as firmly. I've tried both, and the freeze-dried version gives you brighter color and cleaner slices every time.
Storage and Make-Ahead Tips
These squares keep beautifully in an airtight container in the fridge for up to five days, and they actually taste better the second day once the flavors have had time to settle. If you want to make them ahead for a party, you can cut them the morning of and store them in a single layer, or leave the whole block unsliced and cut just before serving. Either way, let them sit at room temperature for ten minutes before serving so the fudge softens just enough to feel luxurious on the tongue.
Variations and Swaps
I've swirled in crushed raspberries for a marbled effect, and the tartness plays beautifully against the white chocolate. You can also swap the strawberries for freeze-dried mango or passion fruit if you want to experiment, or use dairy-free white chocolate and coconut condensed milk for a version that's just as creamy without the dairy. The base recipe is forgiving, so feel free to adjust the strawberry intensity by adding more or less powder until it tastes right to you.
- Try a sprinkle of coarse sugar crystals on top for a little crunch and sparkle.
- Add a few drops of lemon extract to brighten the berry flavor and cut through the sweetness.
- Swap the graham crust for crushed vanilla wafers or even Oreo crumbs for a different twist.
 Save to Pinterest
 Every time I pull these out of the fridge, I'm reminded that the best desserts don't always need heat or complicated steps, just good ingredients and a little patience. They've become my proof that something simple can still feel special.
Recipe FAQs
- → Can I use fresh strawberries instead of freeze-dried?
Fresh strawberries work but require extra steps. Purée and strain them thoroughly to remove seeds and excess moisture, then use double the amount (100g instead of 50g). The texture may be slightly softer, so increase chilling time accordingly.
- → How long do these squares need to chill before serving?
Refrigerate for at least 2-3 hours until completely firm. For optimal texture, chill overnight. The squares can be served chilled straight from the refrigerator or softened at room temperature for 10 minutes for a creamier bite.
- → Can I make these dairy-free?
Substitute dairy-free white chocolate chips and coconut condensed milk. Use coconut oil or vegan butter instead of regular butter for the crust. The texture remains creamy, though chilling time may increase slightly.
- → What's the best way to get clean cuts?
Use a sharp knife warmed under hot water, wiping the blade clean between each cut. Lift the entire block from the pan using parchment overhang, then slice on a cutting board. Room temperature squares cut more cleanly than cold ones.
- → How should I store leftovers?
Keep in an airtight container in the refrigerator for up to 5 days. Separate layers with parchment paper to prevent sticking. These squares freeze well for up to 2 months—thaw overnight in the refrigerator before serving.
- → Can I customize the crust?
Yes! Graham crackers, digestive biscuits, vanilla wafers, or even Oreo cookies work well. Maintain the 2:1 ratio of crumbs to melted butter for proper texture. For extra flavor, add a tablespoon of sugar or cinnamon to the crumb mixture.